How To Use The Noise Gate Plugin In Logic Pro
Nov 01, 2022
In this post, I will show you how to use the noise gate plugin in Logic Pro. I'l also show you some good noise gate paid plugin alternatives but we'll focus on the stock Logic Pro plugin just to be sure we're on the same page.
I'd also like to touch on how you can use noise gate not just to remove background noise, hiss, or hum but the noise gate plugin can be a production tool that can be great to use on drums. We'll dive more on using noise gate as a production tool at the end of the post.
In this post, we'll be using audio and midi in our noise gate examples. The plugin works the same on both.
What Does A Noise Gate Plugin Do?
You can think of a noise gate plugin as an actual gate. Whether that's a gate to a caste, or a gate to family garden. Gates are the same thing. They open their doors and they close their doors.
A noise gate plugin does exactly the same. They open and close their doors. When the doors are open, sound gets through, and you can hear it. When the doors are closed, no sound gets through, it's just silence.
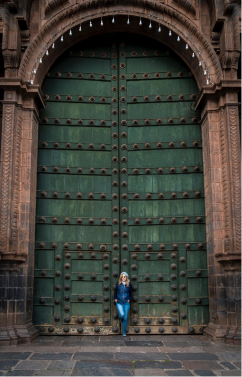
Take note of the image below. The gates are closed, therefore, you can't hear any sound. As soon as you start to open these big green gates, sound will start coming through.
Why would you use a noise gate plugin?
Common use cases for noise gate plugins are to reduce background noise, hum, or any sound that you don't want heard. Essentially, you close the gate when those sounds are happening so you don't hear them.
Other use cases could be to generate interesting sounds by closing and opening the gates quickly. Giving the effect of sound coming in and out really quickly. We'll get into more of this in the production section.
Getting Started With Noise Gate
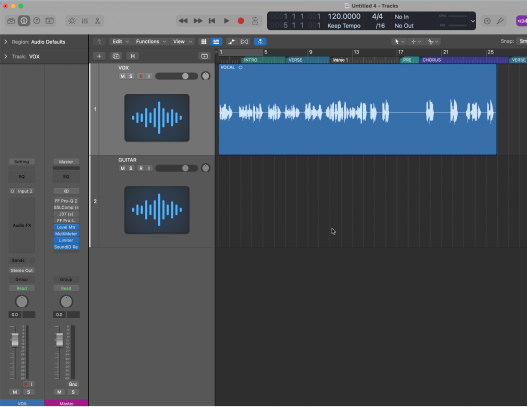
Open of a new Logic Pro project or start with the existing project you have. For example, we'll be using a vocal track. Therefore, I'll go ahead and record my vocals onto an audio track. You can follow along with any type of audio track or midi track. Here's what my vocal track looks like:
You will need to add the noise gate plugin in the left hand inspector window. Click on the empty plugin insert window to add a plugin in Logic Pro. Take note of the image below.
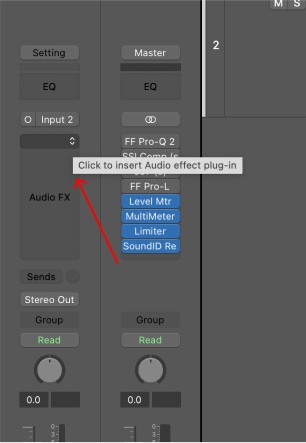
In the inspector plugin window, navigate to Dynamics > Noise Gate > Mono.
If you're working with a stereo track then Logic will give you the option to choose stereo. In our case, we'll still with mono.

The noise gate plugin will pop open and should look like this. If your noise gate plugin does not look like the image below then you should consider updating Logic Pro.
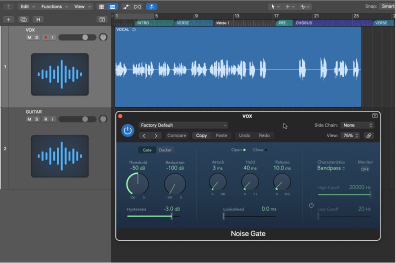
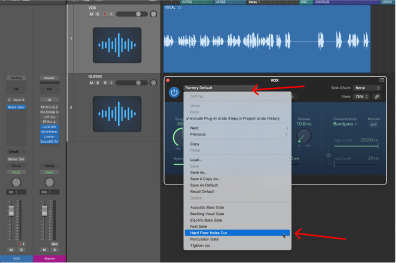
The first thing that I would like to show you within the noise gate plugin are the presets available to you within a few clicks. Navigate to the top of the noise gate plugin, there is a drop down list that says "Factory Default". Click on this and you'll see a variety of presets that you can start with to get going. For instance, check out the Hard Floor Noise Cut preset below.
What are all the dials, sliders, and knobs?
In order not to overwhelm you with new words, I am going to brush on the parameters in the noise gate plugin that you shouldn't concern yourself with as a beginner. However, I will show you the parameters that are very important to know.
Threshold
This is arguably the most important noise gate parameter. I think most producers would agree with me here. This is what sets the noise gate plugin in motion. You can almost think of it as the on or off button. The noise threshold parameter acts in a very similar fashion as does the threshold parameter in a compressor.
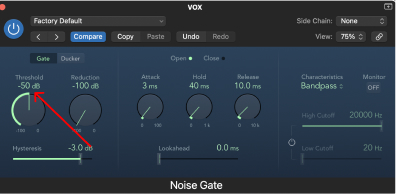
The default threshold is -50db. You'll likely need to change this in order to engage the noise gate plugin but how do you know where to set it? A good starting point is to find out where your audio track or midi track is peaking at. On the other hand, finding out what is the loudest point in your audio track or midi track.
In order to find this out, play your audio or midi track all the way though and the look at the the peak value in the inspector window.
For example, let's take note of my vocal track below, I haven't yet played it through so notice that there is no peak value.
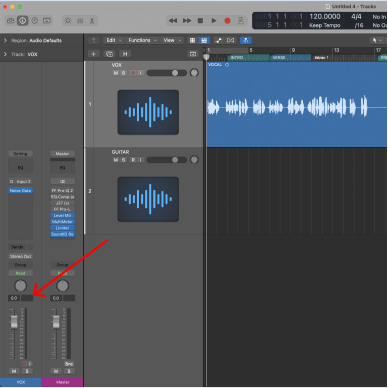
When I press play on my vocal track, Logic is going to show me the loudest part in my vocal by displaying a decibel (db) value in the inspector window. Notice that I now have a green db value of -9.3. It is green because it is below 0 db.

Let's now put this -9.5 db peak value in perspective to the threshold value. How do they relate?
This means that if you set your noise gate threshold value to -9.5 db no sound will happen. Essentially, you're telling the noise gate plugin to only engage with any sound that is above -9.5 db. In my case, there would be no sound because my entire track is below -9.5db.
However, that's a good starting point and a good example to wrap your head around. Find your peak value and then start lowering the threshold on the noise gate plugin until it has the desired affect for you.
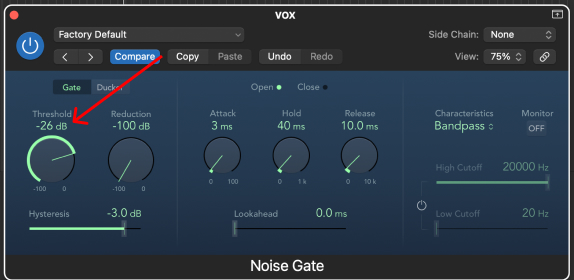
My desired threshold is -26db. This is allowing the noise gate plugin to engage when anything is above -26 db. When anything is below it, the gates will shut and no sound will come through. For example, let's say there is a fan noise happening at -28db. No need to worry about the fan noise anymore. The noise gate plugin is cleaning it up.
Noise Gate Reduction
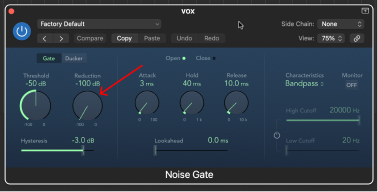
The noise gate reduction is how much you would like to reduce the sound. Think of it like how much do you want to close the gates? All the way? A lot? A tiny bit? In the image below, the reduction is set at -100 db which is more or less saying close the gates completely. If you want to only close the gates a little bit, find a value that works for you.
Noise Gate Attack, Hold, And Release
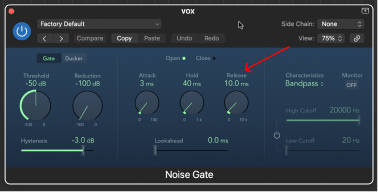
These parameters allow you to customize how the noise gate plugin engages. The attack means "how fast" the gates will close. Think of a slow attack as closing the gates slow. Fast attack would be closing the gates fast. The hold parameter is "how long" the gates should be closed for. The release parameter is "how fast" the gates will release back open. Very similar to attack but just the other way around.
Noise Gate EQ
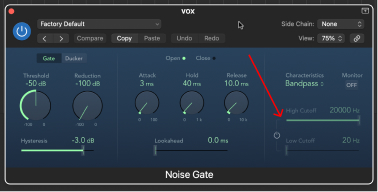
Noise Gate EQ is exactly like a Channel EQ in Logic Pro but you get it right within the noise gate plugin and you only have a high cut or low cut option.
Using The Noise Gate Plugin To Remove Noise
The noise gate plugin is sometimes a "go to" plugin in Logic Pro to remove background noise. It can also be a great way to remove any silence in Logic Pro which can save you the time from having to manually edit everything.
To remove noise using the noise gate plugin. Add the plugin to your track in the inspector window. Very similar to steps we discussed above.
Find the threshold value that allows you to still hear your recording without losing any quality. Depending on where your noise is coming from. For example, if it's a fan noise that might be low or high or a computer fan noise that might have more high frequencies. You can adjust the EQ high cut and low cut to help narrow in on the noise.
If the noise is separated from your recordings, it will be very easy to remove the noise with a noise gate plugin. However, if the noise is baked in with the recording. The noise gate plugin won't be the best option to remove it. For instance, let's say you have a guitar recording in Logic Pro that includes some high hiss of a computer fan noise.
It will be very difficult to remove the fan noise without killing the high end sound of the guitar. You have to ask yourself, is it worth recording the guitar without noise? Often times, it is.
Using The Noise Gate Plugin For Production
This is often an underrated production technique that is great to use on a drum bus. However, I do often find it cool to experiment by putting it on synth busses as well. Take note of the image below where I put a noise gate plugin on a drum bus. This allows the drums to find a different groove than you may have thought. It can sometimes also clean up any unnecessary sustain that you have on hi-hats or snares too. Experiment with the low cut and high cut EQ in the noise gate plugin in order to narrow down on the frequencies you'd like to gate.

I don't do this all the time but I like to try it now and then because you never know what they might end up sounding like. Try adding the noise gate plugin on any track or bus to get interesting sounds.
Noise Gate Paid Plugin Alternatives
I usually use the stock Logic Pro noise gate plugin. To me, it works great and I'm not concerned too much about the "colour" or "texture" of the plugin. For example, when you're using compressors, EQ's, or reverb. They have a lot of "colour" or texture and it matters which one you choose for the job you'd like to get done. When we're talking about noise gate plugins, there isn't a lot of added colour, a little bit though.
For paid noise gate plugins, you can look at the Waves NS-1 plugin which is more of a noise suppressor. It's very easy to use and I talk about it in this post on removing background noise in Logic Pro.
You can also take a look at the Izotope Nectar plugins. In my opinion, Izotope make the best plugins that help edit, clean, and master your audio. For instance, the Izotope RX10 bundle is the closet to magic that I've ever seen and it's saved me hundreds of times.
Final Thoughts on Noise Gate Plugins
Learning how to properly use the noise gate plugin in Logic Pro will be give you more power and flexibility to create. This goes for every single plugin in Logic. Learn how to use it and fully understand it's potential to take your music productions to the next level. I'd love to help you get there. I suggest you get my free 6 pillars on learning Logic Pro faster.


